Storybook v6.5 Custom Tab

Intro

Click here to view source code

Click here to interact with the site

Over the past several years I took a hiatus from updating this blog as I ventured away from WPF development and dove head first into web development, specifically Angular. Since then, my focus the last few years is working with React. Now seems like a good time to express some of the knowledge I came across through my travels learning and becoming comfortable with the language. Perhaps this information will help others as well.  

Recently, I am working with Storybook to display a collection of React components to users. The framework provides a quick and elegant way to demonstrate an assortment of components and even allows for flexible interactivity by updating properties live. The Storybook team finally released version 7 of their framework by announcing it at their first ever conference. This is their first major release for 2.5 years and the features they provide shows. Unfortunately, that includes a plethora of breaking changes. Most notably, the changes that occur from Storybook upgrading from MDX v1 to v2. I was already familiar with some of these issues by attempting to include a change log tab for each component. Although Storybook is moving away from permanent tabs at the top of canvas panes, the framework made it difficult to allow for custom components in customized tabs. I will describe the steps taken to get this working, which involves leveraging MDX v2. 

Create Add-on Tab

The first steps we need to do is create the infrastructure for displaying a tab. Storybook has a good write up about how to do this. Below is a quick summarization:

  • Install the react, typescript, react-dom, @babel/cli packages
  • Create a .babelrc.js file and include the presets @babel/preset-env and @babel/preset-react 
module.exports = { 
    presets: ['@babel/preset-env', '@babel/preset-typescript', '@babel/preset-react' 
    ], 
    env: { 
        esm: { 
            presets: [ 
                [ 
                    '@babel/preset-env', 
                    { 
                        modules: false 
                    } 
                ] 
            ] 
        } 
    } 
}; 
  • Add scripts for building storybook files and individual components 
{
  "scripts": {
        "build": "yarn build:components && yarn build:storybook:babel && yarn build:storybook:tsc", 
        "build:components": "rm -rf ./components/**/build && tsc -b", 
        "build:storybook:babel": "rm -rf dist/storybook/esm && babel ./src/storybook -d ./dist/storybook/esm --env-name esm --extensions \".tsx\"", 
        "build:storybook:tsc": "rm -rf dist/storybook/tsc && tsc --project ./src/storybook"
    }
}
import React from 'react'; 
import { addons, types } from '@storybook/addons'; 
addons.register('change-log', () => { 
    addons.add('change-log', { 
        type: types.TAB, 
        title: 'Change Log', 
        route: ({ storyId, refId }) => { 
            return `/change-log/${storyId}`; 
        }, 
        match: ({ viewMode }) => viewMode === 'change-log', 
        render: () => <div>Our new tab contents!</div> 
    }); 
}); 
  • Add a preset.js file to include the results from the babel build 
function managerEntries(entry = []) { 
    return [...entry, require.resolve('../dist/storybook/esm/manager')]; 
} 
module.exports = { 
    managerEntries 
}; 
module.exports = { 
  "stories": [ 
    "../stories/**/*.stories.mdx", 
    "../stories/**/*.stories.@(js|jsx|ts|tsx)" 
  ], 
  "addons": [ 
    "@storybook/addon-links", 
    "@storybook/addon-essentials", 
    "@storybook/addon-interactions",   
    "../src/storybook/preset.js" 
  ], 
  "framework": "@storybook/react" 
} 

Dynamically Read Tabs

Now we have a Change Log tab next the Canvas and Docs tab. Next we want to display change log information based on the currently selected component. We start by creating a React component to handle displaying the tab. 

import React, { FC } from 'react'; 
export const ChangeLogReader: FC<any> = () => { 
    return <>Change Log Reader Custom Component</>; 
}; 
 
ChangeLogReader.displayName = 'ChangeLogReader'; 
 
export default ChangeLogReader; 

As the name implies, this component is going to dynamically parse through our components and find any that have a *.change-log.mdx file and load its contents to the screen when the user selects the `Change Log` tab.  In order to do that, we need to leverage a webpack loader to read its contents. As a first attempt, the `raw-loader` allows for this ability. First, we will retrieve the name of the component using the Storybook api hook. Inside our reader component, we will use the parsed out component name taken from the storyId. The full file path is needed since webpack runs a static analysis over files so restricts dynamic imports to only known file paths.  

import { useStorybookState } from '@storybook/api';  
import React, { FC, useEffect, useState } from 'react'; 

export const ChangeLogReader: FC = ({ componentName }: ChangeLogReaderProps) => { 
    const [changeLog, setChangeLog] = useState(undefined as any); 
   const state = useStorybookState(); 
 
    useEffect(() => { 
      const componentName = getComponentName(); 
 if (!componentName) { 
            setChangeLog(undefined); 
            return; 
        } 
        try { 
            const changeLogModule = require(`!!raw-loader!../../../components/${componentName}${componentName}.change-log.mdx`); 
            setChangeLog(changeLogModule?.default); 
        } catch (err) { 
            setChangeLog(undefined); 
        } 
    }, [state.storyId, state.viewMode]); 
 
const getComponentName = () => { 
        const id = new String(state.storyId); 
        if (id.startsWith('components')) { 
            const splitStoryName = id.split('--'); 
            splitStoryName.pop(); 
            const splitComponentName = splitStoryName[0].split('-'); 
            splitComponentName.shift(); 
           return splitComponentName.join(' '); 
        } else { 
            return String(undefined); 
        } 
    }; 
 
    return ( 
        <div 
          style={{ 
                display: 'flex', 
                padding: '12px 20px', 
                backgroundColor: 'white', 
               height: '100%' 
            }} 
        > 
            <div style={{ width: '100%', maxWidth: '1000px', whiteSpace: 'pre-line' }}>{changeLog}</div> 
        </div> 
    ); 
}; 
 
ChangeLogReader.displayName = 'ChangeLogReader'; 
 
export default ChangeLogReader; 

And now we are able to view the MDX file’s raw contents.
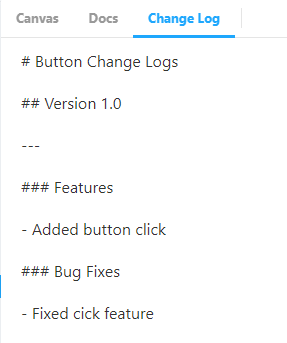
Loading Logs using MDX

  • Since Storybook leverages mdx-js for loading MDX files, we are going to use the same loader to run through any change log files. In the ChangeLogReader, the raw-loader is replaced with @mdx-js/loader. Unfortunately, this is not enough as attempting to load the contents will run into unexpected token errors. The reason is because the output from the mdx-js loader needs transpiling so it can render as HTML. We can do this by prepending the loader with babel-loader. The resulting module will provide an MDX function that will produce the file’s contents when it runs.  
... 
            const changeLogModule = require(`!!babel-loader!@mdx-js/loader!../../../components/${componentName}/${componentName}.change-log.mdx`); 
            setChangeLog(changeLogModule?.default({})); 
… 

And now the MDX file can load dynamically with the correct formatting.
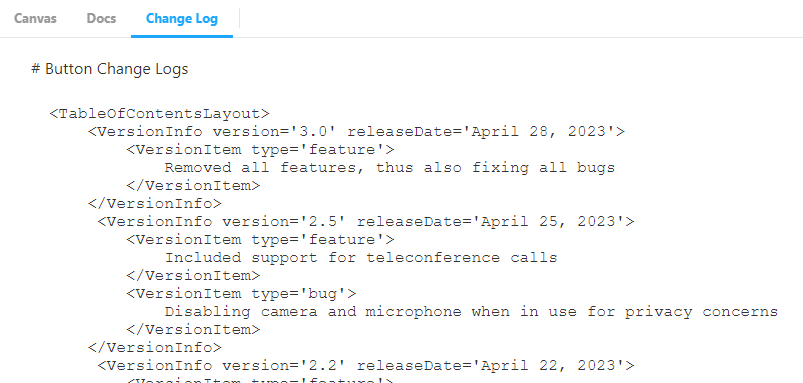
Unfortunately, the page will not parse jsx if the @mdx-js/loader is installed under version one.  Let’s upgrade the loader so we can also allow custom components. 

Using MDXv2

First, upgrade the @mdx-js/loader to version two. Next, we need to upgrade to webpack five along with adding storybook’s manager and builder to handle the new version of webpack: 

yarn add webpack@5 @storybook/builder-webpack5@^6.5.16 @storybook/manager-webpack5@^6.5.16

Then we will update Storybook’s config to use the updated webpack in the main.js config file.

module.exports = { 
    ... 
    core: { 
        builder: 'webpack5' 
    } 
}; 

Since MDXv2 allows for rendering jsx components, we need to tell the dynamic loader which components to load. The components can get provided when executing the mdx file. 

...
const components = { 
    CustomTheme: CustomTheme, 
    TableOfContentsLayout: TableOfContentsLayout, 
    VersionInfo: VersionInfo, 
    VersionItem: VersionItem 
}; 
... 
setChangeLog(changeLogModule?.default({ components: components })); 
...

The other components are just helper components for displaying change logs. After running build and starting storybook again we can see the final result. 
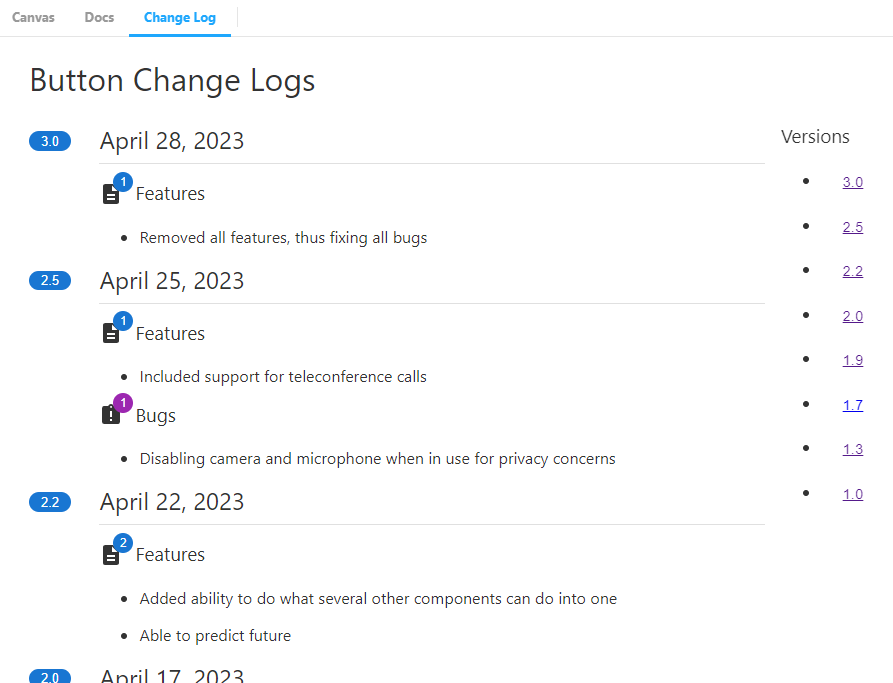
Conclusion

Storybook provides a lot of great features out of the box. It is a shame they decided to remove the tab feature at the top of each page, but I can understand given how much more flexible stories are with writing jsx.

Linux Project REST Server

Introduction

Click here to view the source code

For the past few years, Microsoft is trying to be more cross platform friendly. In their attempt to make the development process seamless across different OS platforms, Visual Studio 2017 is able to create and develop C++ projects in Windows that can deploy, build, and run in Linux. Recently, I have been building projects creating ASP.NET Core REST API servers and wanted to explore how to build a server in C++ through a Linux project.

Running C++ REST SDK in Windows

Before creating a Linux project, let us get familiar with hosting a REST API server in Windows. For the server, I am going to leverage Microsoft’s recently developed C++ REST SDK to simplify the process. The SDK takes advantage of asynchronous operations, multi-platform development, and ability for easy debugging. We will first start by creating a C++ Win32 Console application

There are multiple ways to incorporate the SDK into our project depending on the development environment. For the purpose of this post, I am going to leverage Nuget.

After sifting through the SDKs Samples and Tutorials, the project consists of one rest server class.

class restServer
{
public:
	restServer();
	restServer(utility::string_t url);
	~restServer();

	void on_initialize(const string_t& address);
	void on_shutdown();

	pplx::taskopen() { return m_listener.open(); }
	pplx::taskclose() { return m_listener.close(); }

private:
	void handle_get(http_request message);
	void handle_put(http_request message);
	void handle_post(http_request message);
	void handle_delete(http_request message);
	void handle_error(pplx::task& t);
	http_listener m_listener;
};

When sending an HTTP GET request for “/api/status”, we successfully receive a response.

{
	"body": "GET /api/status HTTP/1.1 Accept: application/json Connection: Keep-Alive Host: localhost:34568",
	"path": "Status response"
}

Setting Up Windows Subsystem

Now that we are able to set up a simple REST server in Windows let us look into deploying the application into Linux. Recently, Microsoft released the Windows Subsystem for Linux (WSL) that allows for hosting a Linux environment within Windows using Bash on Windows. In order to work with WSL, there are a series of steps needed for setup, most important are making sure the Windows 10 Creators Update is installed on your OS and Visual Studio contains the Visual C++ for Linux configuration. Once the Linux environment is set up on the OS, we will start by creating a Linux Console Application.

Visual Studio will prompt for credentials to connect to the Linux system. Although this post describes how to build and deploy using WSL, any Linux environment will work if you have permission to connect.

Once the project is created, we can view the output when its executed by bringing up the Linux Console (Debug -> Linux Console).

Building the project though provides little information on what is going on underneath the scenes.

We can change this by going into Visual Studio’s Tools -> Options -> Projects and Solutions -> Build and Run and changing the build verbosity to ‘Normal’. The result will better illustrate how Visual Studio deploys the class files to Linux, builds in that environment, deploys the resulting ‘out’ file back to Windows for debugging purposes, and cleans up.

Running C++ REST SDK in Linux

Once the Linux project is able to build and run, we can go ahead and port the REST server code from the Windows C++ project. Even though the Linux project will still take advantage of NuGet to resolve the SDK’s dependencies, the Linux environment will need to contain the same dependencies, which NuGet in Windows does not resolve. After doing an ‘apt-get’ in the Linux environment and building the project you will notice an issue comes up when attempting to compile in Linux.

For some reason the Linux environment cannot resolve missing boost references. Looking through various posts online discussing undefined references seem to suggest the Linux project is not including the right command line arguments.We can fix this by going into the Linux Project’s properties and looking into Linker -> Input. Under Additional Dependencies, we need to include the missing command line arguments here at the end. I kept running into numerous undefined reference issues and after doing enough research online found the missing arguments needed are lboost_system, lcrypto, lssl, and lcpprest.

After including the command line arguments, the project successfully builds and run in my WSL environment.

We can go ahead and test this feature using a REST client and viewing the response. Here, I am using the Advanced REST client (ARC) and we can see the response provided when doing an ‘api/status’ request.

Conclusion

Overall, the ability to build Linux applications in Windows is quite elegant. Coming from a primarily C# .NET background made the process of getting the Linux project to work with Window’s C++ REST SDK quite difficult given how low level you need to understand in order to get everything working (hence changing the build verbosity). The next concept I want to work on is to leverage MAKE files to allow for non-Visual Studio developers to work with the same project in their native Linux environment without having to care what Visual Studio is doing for Windows developers.

MVVM Model Property Setter

Introduction

Click here to view the source code

Working with MVVM tends to require quite a bit of boiler plate code to set up and use. Many developers will encapsulate common functionality to allow for better visibility and maintainability throughout the codebase. One repetitive functionality that occurs within ViewModels is setting properties. Although hiding the business logic for setting a property can be done on a private member, attempting to do the same on the Model is not quite as clean. In this article I will provide a solution to help reduce boilerplate code for setting a property using a Model’s property without losing property changed events.

Encapsulating Property Setter

First, let us view how setting a ViewModel’s property can be encapsulated. Using the CallerMemberName attribute for receiving the caller’s property name, an implementation can be made to generically set the incoming value along with firing off a PropertyChanged event:

protected bool SetProperty(ref T storage, T value, [CallerMemberName] string propertyName = null)
{
	if (Equals(storage, value) || string.IsNullOrEmpty(propertyName))
	{
		return false;
	}

	storage = value;
	OnPropertyChanged(propertyName);
	return true;
}

By doing this, setting the property is quite straight forward with just a few lines:

private string _name;
public string Name
{
	get => _name;
	set => SetProperty(
			ref _name,
			value);            
}

Problems occur though when you want to follow the same pattern using a Model object’s property rather than the ViewModel’s private member. The reason a Model’s property cannot be used for our current SetProperty implementation has to do with the ref keyword since arguments must either be a variable, field, or array. Because of this, the Model’s property must be set to a temp variable to help with the transfer.

public string Name
{
	get => _toDo.Name;
	set
	{
		var name = _toDo.Name;
		if (SetProperty(
			ref name,
			value))
		{
			_toDo.Name = name;
		}
	}
}

This does not look pleasing to the eyes and may even provide enough of a reason to ignore SetProperty altogether. But if all the other public properties use SetProperty it provides a divide in how setting the property and firing the property changed events occur. Given that the current method is not acceptable let us try to rewrite the method to provide more flexibility

Property Setter with the Model

Since the ref keyword cannot be used to pass in the Model’s property, the only other solution is to leverage reflection. In order to do this, the Model’s class type, incoming value type, and the Model’s property as a form of expression is needed to reflect down to the PropertyInfo and set the Model’s property. The expression provides much of the metadata needed to retrieve the Model’s property current value, but the GetValue and SetValue methods are where the majority of reflection takes place. The solution looks similar to this:

protected bool SetProperty<TClassType, TValueType>(
TClassType classObj, 
Expression<Func<TClassType, TValueType>> outExpr, 
TValueType value, 
[CallerMemberName] string propertyName = null)
{
        var exprBody = outExpr.Body;
	if (exprBody is UnaryExpression)
	{
		exprBody = ((UnaryExpression)outExpr.Body).Operand;
	}

	var expr = (MemberExpression)exprBody;
	var prop = (PropertyInfo)expr.Member;
	var refValue = prop.GetValue(classObj, null);

	if (Equals(value, refValue))
	{
		return false;
	}
	prop.SetValue(classObj, value, null);
	OnPropertyChanged(propertyName);
}

By adding in this method, our ViewModel’s property setter is reduced to this:

public string Name
{
	get => _toDo.Name;
	set => SetProperty(
		_toDo,
		t => t.Name,
		value);
}

Now the ViewModel’s property setters are much easier to maintain and view.

Conclusion

Although this solution is elegant, the reflection aspect makes the function more of a convenience rather than a practical usage for a very highly performant application. Compared to the two styles of property setters, the new SetProperty is at least 6% slower. The speed costs may be negligible based on the needs of your app, but it is certainly something to keep in mind.

Upgrade Projects: Project Updater

Introduction

Click here to view the source code

Here is the past article related to Project Aggregation:

So, as I mentioned in my last blog post, I was working on a project involving numerous severely out of date .NET projects that I wanted to update. The caveat was I did not want to meticulously go through each one and upgrade them by hand, but instead to leverage Visual Studio’s SDK to do the upgrading process for me. Fortunately, there is a way to do this through the EnvDTE namespace and at this point I was able to first combine all the projects across various solutions into one single solution. After figuring this out I am now ready to start using this single solution to methodically upgrade each project as I see fit.

Project Details

After aggregating all my projects I was able to start working with the EnvDTE.Project class, but trying to figure out how to sift through the details of every project seem to be a bit problematic. It seems Microsoft does not actually give you deep tutorial details about how to mess with Visual Studio (VS) programmatically, which makes sense considering how easily you are able to shoot yourself in the foot (e.g. instances of VS staying open if not closed properly as mentioned in the last blog post). But I did manage to find a stackoverflow post that describes someone’s attempt to also change the target framework for their projects.

I went ahead and created an enumeration to represent all the possible framework versions that was currently available at the time of this writing (I did not bother to go below 3.5 considering I am trying to move towards progress not go backwards):

public enum TargetFramework
{
    [Description("3.5")]
    v3_5,
    [Description("4.0")]
    v4_0,
    [Description("4.5")]
    v4_5,
    [Description("4.5.1")]
    v4_5_1,
    [Description("4.5.2")]
    v4_5_2,
    [Description("4.6")]
    v4_6
}

At this point we can use much of the same implementation from our last post for manipulating VS projects and solutions. The one thing I included was a check for the Solution User Options (.suo) file. The file actually can become quite a necessity when aggregating a large amount of projects as it severely reduces the amount of loading times and manipulating projects for a solution. But this file is not always created if the application is programmatically opening the solution for the first time. For that reason, I attempt to force VS to create one by closing and reopening the solution:

var sourceDirectory = Path.GetDirectoryName(_solutionName);
var suoFiles = (new DirectoryInfo(sourceDirectory)).GetFiles("*.suo");
if (!suoFiles.Any())
{
    _logger.Log("No .suo file, closing and reopening solution");
    await CloseAsync();
    _dte = EnvDTEFactory.Create(_visualStudioVersion);
    await OpenSolution();
}

Just like with the aggregation process we are going to iterate through the upgrade process multiple times in case certain projects are not able to upgrade on a certain pass. At this point the upgrade process starts:

private void UpdateProject(ProjectWrapper project, TargetFramework framework)
{
    project.AttemptToReload();

    if (project.Project.Kind == Constants.vsProjectKindSolutionItems
        || project.Project.Kind == Constants.vsProjectKindMisc)
    {
        project.IsSpecialProject = true;
    }
    else
    {
        if (SetTargetFramework(project.Project, framework))
        {
            project.Reload();
            _logger.Log("Project Updated: {0}", project.Name);
        }

        lock (_nonUpdatedLocker)
        {
            _nonUpdatedProjects.Remove(project);
        }
    }
}

After initially going through the upgrade process I started receiving errors related to ‘Project Unavailable.’ After sifting online I found a solution to this issue by attempting to reload the project if it ends up unloading. The AttemptToReload() method simply attempts to access a property from the EnvDTE.Project and if it fails we will reload it. Although I found a solution to this problem it was off putting not to know why this problem occurs in the first place. But I did notice something after a project needed to be reloaded that it no longer had to be upgraded. So, it seems VS will automatically upgrade projects dependent on certain ones you are upgrading.

After some various trial and error, I noticed I was coming across special types of projects in the code base related to either a solution item or as miscellaneous. Given these types of projects have no purpose to upgrade, I simply marked them as special and move on (in case later I may want to use this information for some other purpose). Once we filter through the special projects, we can start setting the framework for a given project. The first thing we need to retrieve is the project’s target framework moniker, which is just the string value used to set the framework version, along with whether you want to set the project as a Client Profile:

private string GetTargetFrameworkMoniker(TargetFramework targetFramework, bool isClientProfile = false)
{
    var version = targetFramework.ToDescription();

    var clientProfile = isClientProfile ? ClientProfile : String.Empty;

    return String.Format(TargetMoniker, version, clientProfile);
}

So the return string value for wanting to set a projects framework for 4.6 as a non-Client Profile will be “.NETFramework,Version=v4.6”. From this point we will compare if the new target moniker differs from what is already set. If so, we go ahead and grab the project’s property related to ‘TargetFrameworkMoniker’ and set it with our new target monker:

private bool SetTargetFramework(Project project, TargetFramework targetFramework)
{
    var targetMoniker = GetTargetFrameworkMoniker(targetFramework);
    var currentMoniker = project.Properties.Item(TargetFrameworkMonikerIndex).Value;

    if (!currentMoniker.ToString().Contains("Silverlight")
        && !Equals(targetMoniker, currentMoniker))
    {
        project.Properties.Item(TargetFrameworkMonikerIndex).Value = targetMoniker;

        return true;
    }

	…
}

Once this process succeeds we will go ahead and reload the project again since after changing a project property it will tend to unload itself:

_project = (Project)((Array)(_project.DTE.ActiveSolutionProjects)).GetValue(0);

At this point, we are able to upgrade all projects programmatically. But there were quite a few issues I had to deal with that I could not figure out how to resolve through this process.

Issues

  • One of the main issues I still received from my last blog post was the EnvDTE interfaces becoming busy, which would result in a ‘RPC_E_SERVERCALL_RETRYLATER’ exception message. Many AttemptTo methods still had to be used to retry the process to see when the solution would become available again.
  • A problem I could not resolve programmatically was attempting to upgrade ASP.NET projects. Although I attempted to try and resolve this issue programmatically, since there were less than a handful of projects that needed upgrading I went ahead and upgraded them manually.
  • There was also a weird error I ran into stating ‘Inheritance security rules violated by type: ItemsCollectionEditor. Derived types must either match the security accessibility of the base type or be less accessible.’ This was quite a difficult problem to try and hunt down since even finding the offending project seemed to jump around from time to time. I found this post related to the error, which suggested a couple ideas to manipulate the AssesmblyInfo.cs files. Another error I came across as well during this time was a ‘Operation not supported’ exception. And I did find another post for this error as well, but they mostly described an explanation to the issue rather than providing a solution. In the end, I found the arrangement of the projects seemed to only allow for proper upgrading while using VS 2013.

Conclusion

As long as it took to get to the point of being able to automate the upgrade process for all the projects, it turned out this was actually the easiest part of the entire process. Getting the solutions to build again with all the architectural changes made in .NET and making sure applications were able to run again still were not enough. Despite the effort put in, one of the ORMs used within the projects were left so stagnated that later versions were incompatible staying on the old current framework of .NET, but the latest version made such significant changes to their product that it was close to impossible to modify all the hundreds of files using it. Although there were solutions, unfortunately so much time had be spent at this point that the upgrade process was put to a halt. Fortunately though I managed to gain a greater appreciation for VS’s SDK and came out with a couple of highly useful tools for aggregating and upgrading future projects.

Upgrade Projects: Project Aggregation

Introduction

Click here to view the source code

So, I came across quite an interesting situation approaching a new project that had been developed for several years. All of the library projects were never updated past .Net 3.5. Apparently, the developers did not want to take on the arduous task of not only updating all their projects, but also not deal with upgrading one of their ORMs, nHibernate, and the changes the software made between full releases. Which is understandable considering there were close to 200 projects and much of the code infrastructure was not encapsulated. This form of neglect seemed quite troubling to realize since these projects had to get upgraded eventually and left an absurd technical debt on future developers. Well, once the original programmers decided to leave I decided to take it upon myself to try and update these projects myself. Partly out of curiosity, but  mostly because I am a bit of a masochist. In order to start this process though, I decided on letting Visual Studio handle the upgrade process for me. In order to do that I first needed to figure out how to place all my projects into a single solution.

Project Creation with EnvDTE

The first thing I decided was, given the disorganization of the code base, manually upgrading projects was not realistic. Knowing that, I started figuring out how to automate searching through all projects and adding them to a single solution. I knew I would have to make use of Visual Studio’s SDK, more specifically the EnvDTE namespace, which is used for Visual Studio’s core automation process. So I went ahead and started creating a separate class library dedicated to using EnvDTE objects. The first thing I had to add was the base EnvDTE projects:

IncludeEnvDTE

As I was going through the process of building out my code, I ran into an issue with the EnvDTE.Constants references:

EnvDte.Constants Issue

With my lack of experience with Interop Types, I fortunately managed to find a solution here. Apparently Visual Studio just has an issue attempting to embed certain assemblies and the way to get around it is to set the property “Embed Interop Types” on the assembly to false. Through a matter of trial and error I managed to find the ‘envdte’ assembly was the one causing my issues and fixed this promptly:EnvDte.Constants Fix

With this I can now begin creating wrappers for the features I want to employ with the EnvDTE namespace.

Wrappers and Factory

Two of the main features I wanted to take advantage of the EnvDTE namespace are the EnvDTE.Project and _DTE.Solution interfaces. So I went ahead and created two class files to represent these; ProjectWrapper and SolutionWrapper. The ProjectWrapper class is fairly straight forward, which merely exposes one property of the EnvDTE.Project. I started out this path to decouple any issues I may run into for future projects:

public class ProjectWrapper
{
     private Project _project;

     public ProjectWrapper(Project project)
     {
         _project = project;
     }

     public string FullName { get { return _project.FullName; } }
}

As for the SolutionWrapper, much of the project aggregation process exists in this class. To start, we first must create our DTE object, which will contain the Visual Studio solution. I went ahead and place the implementation inside a factory:

internal static class EnvDTEFactory
{
    internal static DTE Create(VisualStudioVersion visualStudioVersion)
    {
        var vsProgID = visualStudioVersion.ToDescription();
        var type = Type.GetTypeFromProgID(vsProgID, true);
        var obj = Activator.CreateInstance(type, true);

        return obj as DTE;
    }
}

The VisualStudioVersion is an enumeration I created to represent the different versions of Visual Studio. The enumeration contains a description attribute that represents the Visual Studio version’s ProgID:

public enum VisualStudioVersion
{
    [Description("VisualStudio.DTE.12.0")]
    VisualStudio2013,
    [Description("VisualStudio.DTE.14.0")]
    VisualStudio2015
}

Since this automation process does not always perform consistently when attempting to add old projects into newer versions of visual studio, I had to have the flexibility to either use Visual Studio 2013 or 2015 (the solutions were at least kept fairly up to date).

Before we can begin aggregating all the projects into our solution, first we have to gather all the project files that exist in our root directory:

private IEnumerable<FileInfo> GetProjectsMissingFromSolution(string rootPath)
{
    var projectsInSolution = GetProjectNamesInSolution();
    var projectsInDirectory = GetProjectFilesInDirectory(rootPath);

    foreach (var projectFile in projectsInDirectory)
    {
        if (!projectsInSolution.Any(p => p.Contains(projectFile.Name)))
        {
            yield return projectFile;
        }
    }
}

As the method name GetProjectNamesInSolution suggests, we first look inside the given solution file, if it already exists, and read the contents through a stream to find all the current projects files. Afterwards, we find all projects in our root directory then ignore any projects that are already inside our solution.

At this point, we first need to open the solution to allow for the addition of projects:

_dte.Solution.Open(_solutionName);

When this occurs successfully, you can actually see the solution in your Task Manager Details tab, but not in the Processes tab. This is good to know in case the application closes abruptly. Although I do my best to clean up these solutions on completion, if you happen to force close the process, these instances will continue to exist until you clean them up yourself:

DTE Solution in Task Manager

At this point we are ready to iterate through our projects and include them into the solution:

private void AddProjects(FileInfo[] missingProjects)
{
    foreach (var project in missingProjects)
    {
        try
        {
            AttemptTo(() =>
            {
                if (_projectWrappers.All(p => p.FullName != project.FullName))
                {
                    AddProjectFromFile(project.FullName);
                    _logger.Log("\tProject Added: {0}", project.Name);
                }
            }, 3).Wait();
        }
        catch (Exception)
        {
            _logger.Log("Skipping adding this project for now");
        }
    }
}

You will notice the method AttemptTo used throughout the SolutionWrapper class. This method will simply attempt to re-execute a given action an X number of times. The reason I need this is because as quickly as it may seem to execute actions through the EnvDTE interfaces, in the background sometimes the process takes longer than expected to complete your last request. So, when this occurs and you attempt to perform another action, an exception is thrown with this message:

The message filter indicated that the application is busy. (Exception from HRESULT: 0x8001010A (RPC_E_SERVERCALL_RETRYLATER))

Although I did find a solution, which involves using the COM interface IMessageFilter. Using this, I could read in the RetryRejectedCall event, or even the Servercall_RetryLater and force the thread to retry the event on its own without throwing an exception. Unfortunately I was never able to get this to work, so instead I accommodated by catching the specific exception, sleeping the thread for a few seconds, then trying again.

For each project, I only need to tell the solution to add it based on the file location:

var project = _dte.Solution.AddFromFile(fileName, false);

From here, I wrap the returned EnvDTE.Project and attempt to go through the aggregation process again if any projects were missed:

for (int i = 0; i < iterations && _missingProjects.Any(); i++) { _logger.Log("************ Attempt {0} ************", i + 1); _logger.Log("Number of projects missing from the solution: {0}", _missingProjects.Count()); AddProjects(_missingProjects); await AttemptTo(() =>
    {
        _missingProjects = _missingProjects.Where(p => _projectWrappers.All(pw => pw.FullName != p.FullName)).ToArray();
    });
}

The reason why I am going through the aggregation process multiple times is because some projects refuse to get loaded unless another dependent project is already included in the solution. When this occurs, sometimes going through the process again with the missing projects will turn out successful after X many iterations.

After all this we simply need to Save the solution:

_dte.Solution.SaveAs(_solutionName);

And finally close it completely, this includes both the solution and the DTE object that contains it:

_dte.Solution.Close();
_dte.Quit();

Then you’re finished. At this point you should be able to go to the location you specified for your solution, open it, and witness all the projects included.

Issues

Although this process works fairly seamlessly with newer, less complicated architectures, when I attempted to apply this solution to this projects code base mentioned earlier I ran into a plethora of problems and tiny gotchas.

  • First of all, when attempting to aggregate almost 200 libraries it can take quite a long time to run, not to mention how many times you have to re-iterate over the project files that end up refusing to add because they need X, Y, and Z projects before they can be included.
  • I also found a Solution User Options (.suo) file that was sometimes created after the process finished was absolutely necessary to open the solution again in a timely manner. Initially, efficient habits led me to remove this file when attempting to check it into source control. But the next time I tried to open the monolithic solution, it was taking almost twice as long as when I automated the process.
  • I had to also specifically ignore certain project files because no matter how much I tried to fix the library itself, Visual Studio refused to include them into my solution. Some projects were just so old and unused that the IDE just could not understand them anymore.
  • One of the biggest issues I was surprised I ran into was dealing with visual studio versions. I actually first started working on this problem under Visual Studio 2013, but as 2015 came out I naturally switched to that IDE, but found I could no longer aggregate more than 1/4 of all my projects. Even specifying ‘Visual Studio 2013’ as my vsProgTypeID made no difference. I had to both use Visual Studio 2013 and set my vsProgTypeID to be the same in order for this to work. It makes sense since the current Visual Studio may not know all the differences used from other versions. Nonetheless, this caught me off guard for a moment.

Conclusion

Overall, I am quite happy with the solution I made. I was able to aggregate all of the relevant libraries along with quite a few defunct ones, which I only figured out after noticing no usages for those projects. This was also a great debugging tool since so many common dependencies were sprawled across several solutions. If a change was ever made from one, it was extremely difficult to tell where that change would break elsewhere. With the aggregated solution, I was able to simply find usages of a change and make the appropriate updates. Also, at the time, I was able to leverage Visual Studio 2013 Ultimate’s Architecture Tools, which made weeding out unused libraries. Now that I was able to collect all my libraries into a single solution, the next step was to find a way to automate the upgrade process.

WPF Round Table Part 2: Multi UI Threaded Control – Fixes

Introduction

Click here to view the source code

Here are the past articles in the WPF Round Table Series:

In my last post I discussed a control I made that allowed for a user to create inline XAML on different UI threads. Today, I am going to discuss a couple of the pitfalls I ran into when attempting to resolve an issue a user asked about

FrameworkTemplates

So, someone asked about how to solve a particular issue with having 4 controls with busy indicators loading all on separate threads. As I was attempting to construct a solution my first instinct was to simply use the ThreadSeparatedStyle property and set the Style’s Template property with the look you want, sort of like this:

<Style TargetType="{x:Type Control}">
    <Setter Property="Template">
        <Setter.Value>
            <ControlTemplate TargetType="{x:Type Control}">
                <multi:BusyIndicator IsBusy="True">
                    <Border Background="#66000000">
                        <TextBlock Text="Random Text" HorizontalAlignment="Center" VerticalAlignment="Center"/>
                    </Border>
                </multi:BusyIndicator>
            </ControlTemplate>
        </Setter.Value>
    </Setter>
</Style>

Suddenly, I was hit with a UI thread access exception when attempting to do this. The problem arises from how WPF allows users to design FrameworkTemplates. WPF instantiates the templates immediately, which will cause threading issues when attempting to access this setter value on our separate UI thread. The key to solving this is by deconstructing the template into a thread safe string by using XAML serialization. First we will grab any FrameworkTemplates from the style:

var templateDict = new Dictionary<DependencyProperty, string>();
foreach ( var setterBase in setters )
{
    var setter = (Setter)setterBase;
    var oldTemp = setter.Value as FrameworkTemplate;
    // templates are instantiated on the thread its defined in, this may cause UI thread access issues
    // we need to deconstruct the template as a string so it can be accessed on our other thread
    if ( oldTemp != null && !templateDict.ContainsKey( setter.Property ) )
    {
        var templateString = XamlWriter.Save( oldTemp );
        templateDict.Add( setter.Property, templateString );
    }
}

Then, while recreating our Style on the newly created UI thread, we reconstruct the template:

foreach ( var setterBase in setters )
{
    var setter = (Setter)setterBase;
    // now that we are on our new UI thread, we can reconstruct the template
    string templateString;
    if ( templateDict.TryGetValue( setter.Property, out templateString ) )
    {
        var reader = new StringReader( templateString );
        var xmlReader = XmlReader.Create( reader );
        var template = XamlReader.Load( xmlReader );
        setter = new Setter( setter.Property, template );
    }
    newStyle.Setters.Add( setter );
}

Now we are able to design our UI thread separated control inline our main Xaml and also any FrameworkTemplates that are defined within.

XAML Serialization Limitations

I actually ran into another error when attempting to insert my custom UserControl into the UI thread separated Style’s template. It involved a ResourceDictionary duplicate key error. This problem absolutely dumbfounded me; not only in trying to understand why the same resource would try to be defined twice, but also how can there be duplicates on a newly created UI thread. After racking my head for hours to come up with a work around solution I eventually found out the direct cause of the error in question. It had to do with how the XamlWriter class serializes the given XAML tree. To give you an idea let’s say we have our ThreadSeparatedStyle defined like this:

<Style TargetType="{x:Type Control}">
    <Setter Property="Template">
        <Setter.Value>
            <ControlTemplate TargetType="{x:Type Control}">
                <Border Width="100" Height="50" VerticalAlignment="Bottom">
                    <Border.Resources>
                        <converters:ColorValueConverter x:Key="ColorValueConverter"/>
                    </Border.Resources>
                    <Border.Background>
                        <SolidColorBrush Color="{Binding Source='Black', Converter={StaticResource ColorValueConverter}}"/>
                    </Border.Background>
                    <TextBlock Text="Random Text" HorizontalAlignment="Center" VerticalAlignment="Center" Foreground="White"/>
                </Border>
            </ControlTemplate>
        </Setter.Value>
    </Setter>
</Style>

When Xaml.Save attempts to serialize the ControlTemplate here is our string result:

<ControlTemplate TargetType="Control"
                 xmlns="http://schemas.microsoft.com/winfx/2006/xaml/presentation"
                 xmlns:cpc="clr-namespace:Core.Presentation.Converters;assembly=Core"
                 xmlns:x="http://schemas.microsoft.com/winfx/2006/xaml">
    <Border Width="100" Height="50" VerticalAlignment="Bottom">
        <Border.Background>
            <SolidColorBrush Color="#FF000000" />
        </Border.Background>
        <Border.Resources>
            <cpc:ColorValueConverter x:Key="ColorValueConverter" />
        </Border.Resources>
        <TextBlock Text="Random Text" Foreground="#FFFFFFFF" HorizontalAlignment="Center" VerticalAlignment="Center" />
    </Border>
</ControlTemplate>

Now, if we decided to wrap this into a UserControl, called RandomTextUserControl, it may look like this:

<UserControl x:Class="MultiUiThreadedExample.RandomTextUserControl"
             xmlns:x="http://schemas.microsoft.com/winfx/2006/xaml"
             xmlns:converters="clr-namespace:Core.Presentation.Converters;assembly=Core">
    <UserControl.Resources>
        <converters:ColorValueConverter x:Key="ColorValueConverter"/>
    </UserControl.Resources>
    <Border Width="100" Height="50" VerticalAlignment="Bottom">
        <Border.Background>
            <SolidColorBrush Color="{Binding Source='Black', Converter={StaticResource ColorValueConverter}}"/>
        </Border.Background>
        <TextBlock Text="Random Text" HorizontalAlignment="Center" VerticalAlignment="Center" Foreground="White"/>
    </Border>
</UserControl>

When we replace our current XAML with this control we will receive the ResourceDictionary XamlParseException because it is trying to include ‘ColorValueConverter’ more than once. If we go back to our Xaml.Save result we will find our culprit:

<ControlTemplate TargetType="Control"
                 xmlns="http://schemas.microsoft.com/winfx/2006/xaml/presentation"
                 xmlns:mute="clr-namespace:MultiUiThreadedExample;assembly=MultiUiThreadedExample"
                 xmlns:cpc="clr-namespace:Core.Presentation.Converters;assembly=Core"
                 xmlns:x="http://schemas.microsoft.com/winfx/2006/xaml">
    <mute:RandomTextUserControl>
        <mute:RandomTextUserControl.Resources>
            <cpc:ColorValueConverter x:Key="ColorValueConverter" />
        </mute:RandomTextUserControl.Resources>
        <Border Width="100" Height="50" VerticalAlignment="Bottom">
            <Border.Background>
                <SolidColorBrush Color="#FF000000" />
            </Border.Background>
            <TextBlock Text="Random Text" Foreground="#FFFFFFFF" HorizontalAlignment="Center" VerticalAlignment="Center" />
        </Border>
    </mute:RandomTextUserControl>
</ControlTemplate>

As you can see, XamlWriter.Save is actually including our parent level resources from RandomTextUserControl. This will cause duplication issue since it will attempt to add the resources displayed here plus the ones already defined inside RandomTextUserControl. The reason is because XamlWriter tries to keep the result self-contained. Meaning, the final result will be a single page XAML tree. Unfortunately, the process tends to add any referenced resources that may come from the overall application. This limitation, along with others, are actually documented by Microsoft. So, the solution here is to either put all your resources into the first content elements resources property or define the design of your control using a template, like this:

<UserControl x:Class="MultiUiThreadedExample.RandomTextUserControl"
             xmlns:x="http://schemas.microsoft.com/winfx/2006/xaml"
             xmlns:converters="clr-namespace:Core.Presentation.Converters;assembly=Core"
             xmlns:multiUiThreadedExample="clr-namespace:MultiUiThreadedExample">
    <UserControl.Template>
        <ControlTemplate TargetType="{x:Type multiUiThreadedExample:RandomTextUserControl}">
            <ControlTemplate.Resources>
                <converters:ColorValueConverter x:Key="ColorValueConverter"/>
            </ControlTemplate.Resources>
            <Border Width="100" Height="50" VerticalAlignment="Bottom">
                <Border.Background>
                    <SolidColorBrush Color="{Binding Source='Black', Converter={StaticResource ColorValueConverter}}"/>
                </Border.Background>
                <TextBlock Text="Random Text" HorizontalAlignment="Center" VerticalAlignment="Center" Foreground="White"/>
            </Border>
        </ControlTemplate>
    </UserControl.Template>
</UserControl>

I actually prefer this method since it reduces an unnecessary ContentPresenter from being created and allows for more seamless TemplateBinding with the parent and Triggering.

WPF Round Table Part 2: Multi UI Threaded Control

Introduction

Click here to view the source code

Here are the past articles in the WPF Round Table Series:

In this series I want to express some of the knowledge I gained in WPF over the years when tackling unique situations. For today’s post though I would like to discuss something that was created quite recently after a brief discussion with coworkers about multi UI threaded controls. I always knew how to create a window on a separate UI thread, but what if you wanted a control to be part of a main window, yet have its own dispatcher message pump?

New Window UI

Well to start off we need to understand how to even spawn a new WPF supported UI thread. This article explains how to launch a window on a completely new UI thread. The creation process is actually quite simple as demonstrated in this code snippet:

Thread thread = new Thread(() =>
{
    Window1 w = new Window1();
    w.Show();
    w.Closed += (sender2, e2) =>
    w.Dispatcher.InvokeShutdown();
    System.Windows.Threading.Dispatcher.Run();
});
thread.SetApartmentState(ApartmentState.STA);
thread.Start();

Here we start by simply creating a new thread which will host our new Window. Inside the thread we create a window and make sure the Dispatcher (which will get automatically created on demand for this thread when accessed) starts the message pump. We also handle shutting down the message pump on the window’s Closed event. At the end we set the thread’s ApartmentState to be single-threaded apartment (STA) rather than multithreaded partment (MTA) since WPF UI threads cannot be multithreaded. Once we start the thread we can see our new window now runs on its own UI thread.

Non-Interacting Host

Although a new window has its benefits, what if you want a UI independent control placed inside your main window? Well this MSDN articleexplains how this process can occur using a HostVisual class. The greatest benefit HostVisual provides is a way to arbitrarily connect any Visual to a parent visual tree. Unfortunately, there is not a way to fully measure, arrange, and render an item through a HostVisual without a presentation source. So we create our own presentation source which simply contains and displays our HostVisual to show in our window. Here is the main components of the class:

private readonly VisualTarget _visualTarget;
public VisualTargetPresentationSource( HostVisual hostVisual )
{
    _visualTarget = new VisualTarget( hostVisual );
    AddSource();
}
public override Visual RootVisual
{
    get
    {
        return _visualTarget.RootVisual;
    }
    set
    {
        Visual oldRoot = _visualTarget.RootVisual;
        // Set the root visual of the VisualTarget.  This visual will
        // now be used to visually compose the scene.
        _visualTarget.RootVisual = value;
        // Tell the PresentationSource that the root visual has
        // changed.  This kicks off a bunch of stuff like the
        // Loaded event.
        RootChanged( oldRoot, value );
        // Kickoff layout...
        UIElement rootElement = value as UIElement;
        if ( rootElement != null )
        {
            rootElement.Measure( new Size( Double.PositiveInfinity, Double.PositiveInfinity ) );
            rootElement.Arrange( new Rect( rootElement.DesiredSize ) );
        }
    }
}
protected override CompositionTarget GetCompositionTargetCore()
{
    return _visualTarget;
}

And running the sample project you can test this by toggling the busy indicator:

toggle


The main caveat with this method is that you are unable to interact with the control, which is fine for the purpose I want for this control. But even though I was able to create a control independent of the UI I still had issues positioning the thread separated control in relation to my main window.

Decorator with Child Elements

I managed to stumble upon another article that not only addressed the issue of alignment, but goes one step further by allowing the control to have child elements as well. I’ll include a ‘Child’ property along with a ‘ContentProperty’ attribute at the header of my class so that I can create UIElements right into XAML. Here is the logic that helps display our UI content onto a separate thread:

protected virtual void CreateThreadSeparatedElement()
{
    _hostVisual = new HostVisual();
    AddLogicalChild( _hostVisual );
    AddVisualChild( _hostVisual );
    // Spin up a worker thread, and pass it the HostVisual that it
    // should be part of.
    var thread = new Thread( CreateContentOnSeparateThread )
    {
        IsBackground = true
    };
    thread.SetApartmentState( ApartmentState.STA );
    thread.Start();
    // Wait for the worker thread to spin up and create the VisualTarget.
    _resentEvent.WaitOne();
    InvalidateMeasure();
}

Since we are creating a new HostVisual we need to make sure we define the parent-child relationship between the HostVisual and our UI control by calling ‘AddLogicalChild’ and ‘AddVisualChild’. Let’s take a look at how we are creating our UI content on a separate thread:

private void CreateContentOnSeparateThread()
{
    if ( _hostVisual != null )
    {
        // Create the VisualTargetPresentationSource and then signal the
        // calling thread, so that it can continue without waiting for us.
        var visualTarget = new VisualTargetPresentationSource( _hostVisual );
        _uiContent = CreateUiContent();
        if (_uiContent == null)
        {
            throw new InvalidOperationException("Created UI Content cannot return null. Either override 'CreateUiContent()' or assign a style to 'ThreadSeparatedStyle'");
        }
        _threadSeparatedDispatcher = _uiContent.Dispatcher;
        _resentEvent.Set();
        visualTarget.RootVisual = _uiContent;
        // Run a dispatcher for this worker thread.  This is the central
        // processing loop for WPF.
        Dispatcher.Run();
        visualTarget.Dispose();
    }
}

Here we can see us using our VisualTargetPresentationSource custom class to contain the HostVisual. The ‘CreateUiContent’ method is simply a protected virtual method that creates our content for us and can be overrided by inheriting classes. To make sure both our child content and the HostVisual is represented in our control we need to override the ‘VisualChildrenCount’, ‘LogicalChildren’, and ‘GetVisualChild’ methods to take both elements into account. Although this will allow for allow our content to render, our UI separated content will have measuring issues if the Child content has limited size or merely does not exist. To fix this we are going to override the ‘Measure’ and ‘Arrange’ methods like so:

protected override Size MeasureOverride( Size constraint )
{
    var childSize = new Size();
    var uiSize = new Size();
    if ( Child != null )
    {
        Child.Measure( constraint );
        var element = Child as FrameworkElement;
        childSize.Width = element != null ? element.ActualWidth : Child.DesiredSize.Width;
        childSize.Height = element != null ? element.ActualHeight : Child.DesiredSize.Height;
    }
    if ( _uiContent != null )
    {
        _uiContent.Dispatcher.Invoke( DispatcherPriority.Background, new Action( () => _uiContent.Measure( constraint ) ) );
        uiSize.Width = _uiContent.ActualWidth;
        uiSize.Height = _uiContent.ActualHeight;
    }
    var size = new Size( Math.Max( childSize.Width, uiSize.Width), Math.Max( childSize.Height, uiSize.Height) );;
    return size;
}
protected override Size ArrangeOverride( Size finalSize )
{
    if ( Child != null )
    {
        Child.Arrange( new Rect( finalSize ) );
    }
    if ( _uiContent != null )
    {
        _uiContent.Dispatcher.BeginInvoke( DispatcherPriority.Background, new Action( () => _uiContent.Arrange( new Rect( finalSize ) ) ) );
    }
    return finalSize;
}

As you can see I am treating our main parent control mostly like a panel where I either fill out the space given or take the max size of either my Child element or the size of the element on the separate thread.

Thread Separated Style

Although we have our ‘CreateUiContent’ method to instantiate our control from code, what if we want to create our control from a style right within XAML? Well we can create a DependencyProperty called ‘ThreadSeparatedStyle’, but the style itself must be instantiated on the new UI thread or else we’ll run into thread exceptions. In order to get around this issue we are going to recreate the style on the fly using reflection through an anonymous call. Here you can see how this occurs when the style changes:

private static void OnThreadSeparatedStyleChanged( DependencyObject d, DependencyPropertyChangedEventArgs e )
{
    var control = (UiThreadSeparatedControl)d;
    var style = e.NewValue as Style;
    if ( style != null )
    {
        var invokingType = style.TargetType;
        var setters = style.Setters.ToArray();
        control._createContentFromStyle = () =>
        {
            var newStyle = new Style
            {
                TargetType = invokingType,
            };
            foreach ( var setter in setters )
            {
                newStyle.Setters.Add( setter );
            }
            var contentt = (FrameworkElement)Activator.CreateInstance( newStyle.TargetType );
            contentt.Style = newStyle;
            return contentt;
        };
    }
    else
    {
        control._createContentFromStyle = null;
    }
}

Since I use the style’s target type to instantiate the control, the assigned target type in the style should not refer to a base control. I am also holding onto all the setter values for the style so they are preserved on recreation. Although I could avoid using reflection and recreating the style altogether by placing the style in a Themes defined folder Generic.xaml, by doing it this way it allows me to define the style at the same time I create the control:

<multi:UiThreadSeparatedControl IsContentShowing="{Binding ElementName=Toggle, Path=IsChecked}">
    <multi:UiThreadSeparatedControl.ThreadSeparatedStyle>
        <Style TargetType="multi:BusyIndicator">
            <Setter Property="IsBusy" Value="True"/>
        </Style>
    </multi:UiThreadSeparatedControl.ThreadSeparatedStyle>
</multi:UiThreadSeparatedControl>

The convenience of having this as an option seemed to outweigh trying to avoid reflection. Especially since it is much more intuitive to define your styles anywhere in XAML, not just UI independent resource dictionaries.

FrozenProcessControl

Now how could we use this type of control in our application? One scenario could be a case where you want to display a busy cursor if the window happens to freeze. Although it is quite a bad practice for your application to ever freeze. Usually this problem can be circumvented by offloading certain functionality onto a separate, non-UI thread. But sometimes you are left without a choice in the matter. For instance, say you are using a third party control that has become an integral part of your application and suddenly adding new, large amount of data causes the control to inefficiently load all its components on the UI thread. You may not have access to the controls source code or do not have time to replace the control. It would be a much better user experience to at least display something to the user to let it know some form of action is still happening rather than staring at a frozen screen. This is where our FrozenProcessControl comes into play.

At first we will extend our UiThreadSeparatedControl and override the ‘CreateUiContent’ method:

protected override FrameworkElement CreateUiContent()
{
    return new BusyIndicator
    {
        IsBusy = true,
        HorizontalAlignment = HorizontalAlignment.Center
    };
}

We will also have two Timers; one for polling the main window for no response, and another when the window is non-responsive for too long. Here is how our polling method is handled:

private void PollMainWindowTimerOnElapsed( object sender, ElapsedEventArgs elapsedEventArgs )
{
    _pollMainWindowTimer.Stop();
    _nonResponseTimer.Start();
    if ( _mainWindowProcess.Responding )
    {
        _nonResponseTimer.Stop();
        if ( _isContentDisplaying )
        {
            _isContentDisplaying = false;
            _threadSeparatedDispatcher.BeginInvoke( DispatcherPriority.Render, new Action( () =>
            {
                _uiContent.Visibility = Visibility.Hidden;
                _pollMainWindowTimer.Start();
            } ) );
        }
        else
        {
            _pollMainWindowTimer.Start();
        }
    }
}

As you can see we immediately start our non-responsive timer because if the main window’s process is unable to respond, accessing the process will cause the thread to freeze until activity happens again. If we do happen to gain response again and our busy indicator is displaying we need to update its visibility using its UI thread dispatcher to access the separate UI thread. Here we can see how our non-response timer is handled:

private void NonResponseTimer_Elapsed( object sender, ElapsedEventArgs e )
{
    _pollMainWindowTimer.Stop();
    _nonResponseTimer.Stop();
    _isContentDisplaying = true;
    _threadSeparatedDispatcher.BeginInvoke( DispatcherPriority.Render, new Action( () =>
    {
        _uiContent.Visibility = Visibility.Visible;
    } ) );
}

This is pretty straight forward, if the poll timer is frozen from accessing the process we do not want any further events to happen until the window is active again. After that we update the visibility using the separate UI thread to show our busy indicator. Here we can see the control in action in our demo by hitting the Freeze button, viewing the busy indicator on the far right freeze, and then suddenly seeing our thread separated control run on top:

frozen


Conclusion

Overall, this is quite a useful control, but the major caveat to using this is there is no ability to accept user input. Other than that this could easily help offload the build time for certain, display-only controls.

WPF Round Table Part 1: Simple Pie Chart

Introduction

Click here to view source code

Over the years I have been presented with many different situations while programming in WPF, which required a certain Control or class to be created to accommodate. Given all the various solutions I created throughout the years I thought it might be helpful to someone else. During this ongoing series I am going to post some of the more useful classes I have made in the past.

Simple Pie Chart

In one project I was assigned to redesign, there was data coming in that we wanted represented in the form of a pie chart. Initially, we simply displayed the information in the form of one out of many static pie chart images. A specific image would get selected based on what the percentage was closest. Although this solved our immediate needs I believed generating this with GeometryDrawing would make the chart much more accurate and should not be too difficult to create. My immediate goal was to try and represent some type of pie chart in XAML to get an idea of how it could be represented dynamically. Initial searching led to this solution involving dividing a chart into thirds. Following the example given will produce a subdivided geometric ellipse:

Pie-Chart-Example-1

Programmatically Build Chart

Unfortunately, using strictly XAML will not work when attempting to create a pie chart dynamically. This is definitely a great starting point in how we could create this Control, but I needed a better understanding how to create geometric objects programmatically. Doing some more searching I came across this Code Project that describes how to create pie charts from code. My pie chart will be much simpler containing only two slices and taking in a percentage value to represent how the slices will subdivide. I still use an Image to represent how the geometry will be drawn and begin the creation of the root elements:

_pieChartImage.Width = _pieChartImage.Height = Width = Height = Size;
var di = new DrawingImage();
_pieChartImage.Source = di;
var dg = new DrawingGroup();
di.Drawing = dg;

Since I know my starting point of the pie will always be at the top I then calculate where my line segment will end (the PieSliceFillers are brushes representing the fill color):

var angle = 360 * Percentage;
var radians = ( Math.PI / 180 ) * angle;
var endPointX = Math.Sin( radians ) * Height / 2 + Height / 2;
var endPointY = Width / 2 - Math.Cos( radians ) * Width / 2;
var endPoint = new Point( endPointX, endPointY );
dg.Children.Add( CreatePathGeometry( InnerPieSliceFill, new Point( Width / 2, 0 ), endPoint, Percentage > 0.5 ) );
dg.Children.Add( CreatePathGeometry( OuterPieSliceFill, endPoint, new Point( Width / 2, 0 ), Percentage <= 0.5 ) );

My CreatePathGeometry method creates both the inner and outer pie slices using a starting point, the point where the arc will end, and a boolean for ArcSegment to determine how the arc should get drawn if greater than 180 degrees.

private GeometryDrawing CreatePathGeometry( Brush brush, Point startPoint, Point arcPoint, bool isLargeArc )
{
    var midPoint = new Point( Width / 2, Height / 2 );
    var drawing = new GeometryDrawing { Brush = brush };
    var pathGeometry = new PathGeometry();
    var pathFigure = new PathFigure { StartPoint = midPoint };
    var ls1 = new LineSegment( startPoint, false );
    var arc = new ArcSegment
    {
        SweepDirection = SweepDirection.Clockwise,
        Size = new Size( Width / 2, Height / 2 ),
        Point = arcPoint,
        IsLargeArc = isLargeArc
    };
    var ls2 = new LineSegment( midPoint, false );
    drawing.Geometry = pathGeometry;
    pathGeometry.Figures.Add( pathFigure );
    pathFigure.Segments.Add( ls1 );
    pathFigure.Segments.Add( arc );
    pathFigure.Segments.Add( ls2 );
    return drawing;
}

A better to visualize this is through a XAML representation:


<GeometryDrawing Brush="@Brush">
 <GeometryDrawing.Geometry>
   <PathGeometry>
     <PathFigure StartPoint="@Size/2">
       <PathFigure.Segments>
         <LineSegment Point="@startPoint"/>
         <ArcSegment Point="@arcPoint" SweepDirection="Clockwise" Size="@Size/2"/>
         <LineSegment Point="@Size/2"/>
       </PathFigure.Segments>
     </PathFigure>
   </PathGeometry>
 </GeometryDrawing.Geometry>
</GeometryDrawing>

And with that we are able to create quick an easy pie charts as shown here:

Pie-Chart-Example-2

Multi Pie Chart

Although this is suitable for a two sided pie chart, but what if you wanted more? That process is pretty straight forward based off what we already created. By including two dependency properties to represent our collection of data and brushes, we only need to rewrite how my segments are created:

var total = DataList.Sum();
var startPoint = new Point( Width / 2, 0 );
double radians = 0;
for ( int i = 0; i < DataList.Count; i++ ) {     var data = DataList[i];     var dataBrush = GetBrushFromList( i );  var percentage = data / total;  Point endPoint;     var angle = 360 * percentage;   if ( i + 1 == DataList.Count )  {       endPoint = new Point( Width / 2, 0 );   }   else    {       radians += ( Math.PI / 180 ) * angle;       var endPointX = Math.Sin( radians ) * Height / 2 + Height / 2;      var endPointY = Width / 2 - Math.Cos( radians ) * Width / 2;        endPoint = new Point( endPointX, endPointY );   }   dg.Children.Add( CreatePathGeometry( dataBrush, startPoint, endPoint, angle > 180 ) );
    startPoint = endPoint;
}

As you can see, the main difference is now we are accumulating the radians as we traverse the list to take into account any number of data objects. The result allows us to add any number of data items to our pie chart as shown here:

Pie-Chart-Example-3

Conclusion

Although I did not get as much use for this class as I would have preferred, developing this helped me gain experience in manipulating geometry objects, which does not happen often enough.


MVC Series Part 3: Miscellaneous Issues

Introduction

In my first MVC series post, I discussed how to dynamically add items to a container using an MVC controller. Afterwards, I went through the process of unit testing the AccountController. The main purpose of this series was to explain some troublesome hiccups I ran into considering I did not come from a web development background. In this post I want to highlight a few of the minor issues while developing in MVC. One of them is not even related to MVC specifically, but it still caused enough of a headache that hopefully someone reading this can be spared the confusion.

HttpContext in Unit Tests

When I first started unit testing controllers, the HttpContext would return null when attempting to be accessed. The reason for this is because the controllers never assign the class on creation. Instead, controllers are typically created by the ControllerBuilder class. In my last post about unit testing the AccountController, I described a way to mock out the HttpContext, but in the beginning I wanted to try and keep my test project as lean as possible. Since I had not approached testing the AccountController yet and did not want to include a package to mock out an object I only needed to resolve NullReferenceExceptions, I found this clever post to quickly bypass this issue. By providing the HttpContext with a simple Url I no longer received an exception and was able to test the other components of a controller. I decided to wrap this functionality inside a class:

public class TestHttpContext : IDisposable
{
    public TestHttpContext()
    {
        HttpContext.Current = new HttpContext(
            new HttpRequest( null, "http://tempuri.org", null ),
            new HttpResponse( null ) );
    }
    public void Dispose()
    {
        HttpContext.Current = null;
    }
}

Since I am creating a new controller for each test, I needed the HttpContext to be recreated and destroyed each time. So, I went ahead and placed this inside a base test class that all controller tests will inherit:

public class TestBase
{
    private TestHttpContext _testContext;
    [TestInitialize]
    public void Initialize()
    {
        _testContext = new TestHttpContext();
    }
    [TestCleanup]
    public void TestCleanup()
    {
        _testContext.Dispose();
    }
}

Mocking out the HttpContext would provide better unit testing standards, but my minimalist personality found this solution too good to pass for the time being.

DbContext Non-Thread Safe

After updating my project to use Unity, I decided to take better advantage of the dependency injection design pattern by making the DbContext a singleton to prevent having to constantly re-initialize the connection to our Azure database. Early on after this change it became apparent our website was very inconsistent when trying to write to the database. Since many changes were occurring during this time, I did not immediately presume the DbContext as a singleton was the cause until I ran into this post.

So it seems I could still gain a performance boost by only creating the DbContext once per thread call, but how could I do this implementation using dependency injection? “Fortunately”, a new version of Unity provides a LifetimeManager catered specifically to this calledPerRequestLifetimeManager.

This solution dramatically reduced my refactoring costs to close to zero, which was very desirable at this point in the project where time constraints were becoming out of reach. Later, I did a more thorough research into DbContext and you will notice this is why I put ‘Fortunately’ in quotes. As this MSDN post mentions, PerRequestLifetimeManager is bad practice to use when dealing with the DbContext. The reason is because it can lead to hard to track bugs and goes against the MVC principle of registering objects with Unity that will remain stateless. Although our application never ran into issues after implementing this LifetimeManager, in the future it is best to simply create and destroy the DbContext every time.

Ajax Caching in IE

This last problem is not so much an MVC issue, but a cross browser bug. And it is not so much a bug as it is more of understanding there are different specifications for each browser. As I mentioned in my post for creating Dynamic Items, I was using ajax calls to dynamically modify the DOM of a container. Throughout the project though we would intermittently hear bugs when attempting to add an item and trying to save. Each time the bug would re-occur, I would view the problem area, look stupefied at the cause of the issue, check in a fix, and the problem would go away, only to show up again a week later. What was going on here? Especially since the files in this area had been untouched for weeks!

The problem? Internet Explorer and its aggressive caching. The other browsers are not this adamant about caching ajax calls, at least when it comes to developing testing. And the solution to the problem was a bit more demoralizing:

$.ajax({
    async: false,
    cache: false,
    url: '/Controller/Action',
}).success(function (partialView) {
    // do action
});

One line of code solved weeks of headache Although any fairly seasoned web developer would probably speculate the browser being at fault, as someone who only ever has to deal with one set of specifications (.NET/WCF/EF/WPF/SQL) our team and I were not use to meticulously testing each new feature on every available browser. This meant although someone would find the bug in IE, but in retesting they may have coincidentally retested the feature in Chrome. Or, even worse, republishing the test caused the caching to reset so retesting the feature would get the pass the first time, but would not realize how broken it was until days later. All this means is we need to have a different method for testing web projects and to continue our understanding of how web development can act.

Summary

Working in MVC has been a great learning experience and helped continue my growth in developing in web. Despite my complaints and the hair-splitting, alcohol consuming  problems I do enjoy the breadth and stability MVC provides to the web world. I will continue my progress in the realms of web development and hope these small roadblocks will become less frequent, at the very least for my sanity’s sake.

MVC Series Part 2: AccountController Testing

Introduction

Click here to view source code

In my first post of the series, I explained the perils and pitfalls that I had to overcome with dynamically adding items. One of the next problem I ran into was dealing with unit testing the AccountController. More specifically, attempting to represent the UserManager class. Since unit testing is a fundamental necessity for any server project, testing the controller was a necessity.

Attempting to Test

So, let’s first create a test class for the AccountController and include a simple test for determining if a user was registered. Here is how my class first appeared:

[TestClass]
public class AccountControllerTest
{
    [TestMethod]
    public void AccountController_Register_UserRegistered()
    {
        var accountController = new AccountController();
        var registerViewModel = new RegisterViewModel
        {
            Email = "test@test.com",
            Password = "123456"
        };
        var result = accountController.Register(registerViewModel).Result;
        Assert.IsTrue(result is RedirectToRouteResult);
        Assert.IsTrue( _accountController.ModelState.All(kvp => kvp.Key != "") );
    }
}

When running the unit test I get a NullReferenceException thrown when attempting to access the UserManager. At first I assumed this was due to not having a UserManager created, but debugging at the location of the thrown exception led me to this:

ApplicationUserManager UserManager
{
     get
     {
          return _userManager ?? HttpContext.GetOwinContext().GetUserManager<ApplicationUserManager>();
     }
     private set
     {
          _userManager = value;
     }
}

The exception is actually getting thrown on the HttpContext property that is part of ASP.Net internals. We cannot assign HttpContext directly on a controller since it is read-only, but the ControllerContext on it is not, which explains how to do that here. We can create this easily enough by installing the Moq NuGet package to help mock this out. We will install the package and place the initialization of our AccountController into a initialize test class that will get called prior to every unit test:

private AccountController _acocuntController;
[TestInitialize]
public void Initialization()
{
     var request = new Mock<HttpRequestBase>();
     request.Expect( r => r.HttpMethod ).Returns( "GET" );
     var mockHttpContext = new Mock<HttpContextBase>();
     mockHttpContext.Expect( c => c.Request ).Returns( request.Object );
     var mockControllerContext = new ControllerContext( mockHttpContext.Object, new RouteData(), new Mock<ControllerBase>().Object );
     _acocuntController = new AccountController
     {
          ControllerContext = mockControllerContext
     };
}

Now when we run our application we no longer have to worry about the HttpContext, but still there is another NullReferenceException being thrown. This time it is from the call to ‘GetOwinContext’.

Alternative Route

At this point, attempting to mock out all of HttpContext’s features seems like a never ending road. All we really want is the ability to use UserManager’s feature to register a user. In order for us to do that we will need to mock out the IAuthenticationManager. This is no easy feat considering how well embedded the UserManager is within the AccountController. Fortunately, a post mentioned here mentions the right direction for substituting the ApplicationUserManager.

What we want to do is create a new class, called AccountManager, that will act as an access to the UserManager. The AccountManager will take in an IAuthenticationManager and also a IdentityDbContext, in casewe need to specify the specific context. I decided to place this class in a separate library that both the MVC and unit test libraries can access. If you decide to do the same and copy the class from the sample project, most of the dependencies will get resolved except for the HttpContextBase extension ‘GetOwinContext’. The reason is because that extension needs Microsoft.Owin.Host.SystemWeb. You can simply install this dependency in your library as a Nuget package through this command:

  • Install-Package Microsoft.Owin.Host.SystemWeb

Now that we have our AccountManager, we need to make sure our AccountController will use this class rather than attempting to create the UserManager from HttpContext. This starts with the constructor, where now we will have it accept our manager rather than passing in a UserManager:

public AccountController( AccountManager<ApplicationUserManager, ApplicationDbContext, ApplicationUser> manager)
{
    _manager = manager;
}

Then we will change the access to AccountController.UserManager to use the AccountManager:

public ApplicationUserManager UserManager
{
    get
    {
        return _manager.UserManager;
    }
}

Dependency Injection

Now the immediate problem with this is that MVC’s controllers are stateless and handle the creation of all the classes, including any objects that are injected into the class. Fortunately, Unity has dependency injection specifically for MVC that will allow us to inject our own objects. As of this writing, I went ahead and installed Unity’s MVC 5, which is referenced here. It’s a very seamless process to integrate Unity into your MVC project. After installing the package, open the Global.asax.cs, where your Application_Start() method is stored and add in ‘UnityConfig.RegisterComponents();’. Afterwards, in the App_Start folder, open the UnityConfig.cs file and register our AccountManager:

container.RegisterType<AccountManager<ApplicationUserManager, ApplicationDbContext, ApplicationUser>>(new InjectionConstructor());

We will also need to override our initialization process for the AccountController to ensure the AccountManager either gets the embedded HttpContext from the AccountController or one we provide during test:

protected override void Initialize( RequestContext requestContext )
{
    base.Initialize( requestContext );
    _manager.Initialize( HttpContext );
}

We will also need to remove the references to AuthenticationManager and instead have our AccountController reference the AccountManager’s AuthenticationManager. This will also cause our SignInAsync method to this:

private async Task SignInAsync( ApplicationUser user, bool isPersistent )
{
    await _manager.SignInAsync( user, isPersistent );
}

Mocking AccountController

Now we can run our application and register a user using our AccountManager. With this implementation in place, we simply need to mock out our IAuthenticationManager. Here is a post that describes a bit of the process. So, following suit, we go ahead and mock out the necessary classes for initializing up our test AccountController, all under the same Initialization class:

private AccountController _accountController;
[TestInitialize]
public void Initialization()
{
    // mocking HttpContext
    var request = new Mock<HttpRequestBase>();
    request.Expect( r => r.HttpMethod ).Returns( "GET" );
    var mockHttpContext = new Mock<HttpContextBase>();
    mockHttpContext.Expect( c => c.Request ).Returns( request.Object );
    var mockControllerContext = new ControllerContext( mockHttpContext.Object, new RouteData(), new Mock<ControllerBase>().Object );
    // mocking IAuthenticationManager
    var authDbContext = new ApplicationDbContext();
    var mockAuthenticationManager = new Mock<IAuthenticationManager>();
    mockAuthenticationManager.Setup( am => am.SignOut() );
    mockAuthenticationManager.Setup( am => am.SignIn() );
    var mockUrl = new Mock<UrlHelper>();
        var manager = new AccountManager<ApplicationUserManager, ApplicationDbContext, ApplicationUser>( authDbContext, mockAuthenticationManager.Object );
    _accountController = new AccountController( manager )
    {
        Url = mockUrl.Object,
        ControllerContext = mockControllerContext
    };
    // using our mocked HttpContext
    _accountController.AccountManager.Initialize( _accountController.HttpContext );
}

Now we can effectively test our AccountController’s logic. It’s unfortunate this process was anything but straight forward, but at least we are able to have better unit test code coverage over our project.